Civet Engine Dev Diary #2
It’s been a bit since the last update and I have been working almost exclusively on the Civet rendering engine, mostly on the rasterizer side. Civet is now in a “functionally complete” condition, where I think every basic feature of a rendering engine is now present (except the UI but I’ll get to that someday). However, when in use, I think it’s obvious some scenes, like Sponza by Crytek, still don’t look quite right with clipped shadows and whatnot. Thus, I’ll still be working on the engine occasionally to include some more features for even more completion, like cascaded shadows and global illumination, and just to get scenes to look even better.
That aside, here’s a number of significant features that have been added since the last update:
- Full image textures loaded for OBJ files, including ambient, diffuse, specular and normal maps
- Normal mapping for surface details
- Shadow mapping for directional and point lights
- Switch from forward shading to deferred shading
which turns out is quite a lot of content I should’ve written updates for, but I’ll try to summarize each process anyways.
Image textures
Civet makes use of the stb_image header library to load images before passing them to OpenGL to handle as an image texture. The stb_image library is very lightweight, consisting of only header files, making it easy to integrate into projects.
int width, height, n_channels;
unsigned char* data = stbi_load(filename.c_str(), &width, &height, &n_channels, 0);
The data loaded is a string of char data that can have any number of image channels. Fortunately, the number of channels is also handled by the stb_image library, which can be obtained by passing a pointer to the function. Then, we can pass the data to OpenGL as an image texture and set its parameters, such as scaling and tiling behavior.
// bind texture ID and pass image texture
glBindTexture(GL_TEXTURE_2D, texture_id);
glTexImage2D(GL_TEXTURE_2D, 0, format, width, height, 0, format, GL_UNSIGNED_BYTE, data);
glGenerateMipmap(GL_TEXTURE_2D);

// define texture parameters
glTexParameteri(GL_TEXTURE_2D, GL_TEXTURE_WRAP_S, GL_REPEAT);
glTexParameteri(GL_TEXTURE_2D, GL_TEXTURE_WRAP_T, GL_REPEAT);
glTexParameteri(GL_TEXTURE_2D, GL_TEXTURE_MIN_FILTER, GL_LINEAR_MIPMAP_LINEAR);
glTexParameteri(GL_TEXTURE_2D, GL_TEXTURE_MAG_FILTER, GL_LINEAR);
The macros that define the image parameters can be found here.
Now the image texture can be binded and unbinded in GPU memory with the texture ID. Civet binds multiple textures for each mesh by looping through the each glActiveTexture and binding an image texture to it.
for (unsigned int i = 0; i < textures.size(); i++) {
    glActiveTexture(GL_TEXTURE0 + i);
    glBindTexture(GL_TEXTURE_2D, textures[i].id);
}
Now, the shader needs to know which image to use. Here is where we use an OpenGL feature called uniforms. A set of image textures may be configured in the shader like this (in GLSL).
struct Material {
    sampler2D diffuse;
    sampler2D specular;
    sampler2D normal;
};

uniform Material material;
We can then specify the shader program, data and data type OpenGL should use to access the data. Specifically for textures, we pass the number of the texture unit corresponding to where we binded the texture through glActiveTexture(), which the sampler2D can then find the image texture. In Civet with the above material struct, it then looks like this.
for (unsigned int i = 0; i < textures.size(); i++) {
    glActiveTexture(GL_TEXTURE0 + i);
    glUniform1i(glGetUniformLocation(shader_program, ("material." + material_type).c_str()), i);    // passes the texture unit ID to sampler2D
    glBindTexture(GL_TEXTURE_2D, textures[i].id);
}
In fact, uniforms are used for a lot more data than just image textures. Different variations of the glUniform functions allow you to pass data to different data structures in the shader, including ints, floats, vectors and matrices. You can find the full list of variations here.
Now we have the sampler2D object in the OpenGL shader, which can now sample the image texture we passed in and render it with the correct color.
Normal mapping
Normal mapping in Civet allows better detailing of surfaces, as it simulates how light interacts with an uneven surface at the micro scale. This is present in most real world surfaces, whereby uneven surfaces have irregular normal vectors at different points and scatter light differently. With normal maps, you can provide details like cracks and bumps without needing a high-poly model, which will significantly reduce rendering efforts.
Normal maps are sent to the shader in the same manner as the other image textures. How it’s used in the shader is where the details come in.
normal = texture(material.normal, texCoords).rgb;
normal = normalize(normal * 2.0 - 1.0)
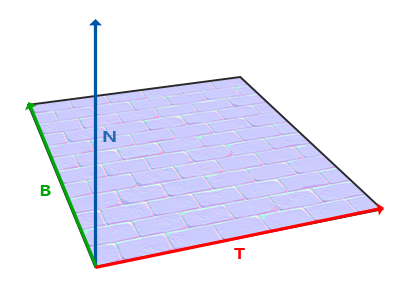
We can sample the normal from the normal map using the corresponding mesh UVs that is passed in from the vertex shader. This gives us a normal with range [0,1], so we have to map it back into the range [-1,1]. Now we could use it for lighting calculations but only if the mesh is stationary. To circumvent this problem, we have to transform the normal vector from something called tangent space.

Normal N, tangent T and bitangent B vectors, from LearnOpenGL
There are various methods to get the normal, tangent and bitangent vectors. Civet uses the Open Asset Import Library (assimp) to load models, which also support various post processing functions when loading the model including generating tangent and bitangent vectors.
Assimp::Importer importer;
const aiScene* scene = importer.ReadFile(filepath, aiProcess_Triangulate | aiProcess_GenNormals | aiProcess_CalcTangentSpace);
Both the normal and tangent vectors are passed into the OpenGL shader program via uniform. Additionally, you could also pass the bitangent vectors as well, but for Civet, we choose to recalculate them in the shader to ensure they are all orthogonal.
vec3 T = normalize(vec3(model * vec4(inTangent, 0.0)));
vec3 N = normalize(vec3(model * vec4(inNormal, 0.0)));

T = normalize(T - dot(T, N) * N);
vec3 B = cross(N, T);
TBN = mat3(T, B, N);
The resulting TBN matrix transforms vectors from the tangent space into world space. Civet uses the TBN matrix to transform the sampled surface normals into world space, which can then be used for lighting calculations.
Alternatively, the inverse of the TBN matrix transforms vectors from world space into tangent space. Then we could transform all other vectors related lighting calculations into the tangent space right in the vertex shader before passing it into the fragment shader. Conveniently, since the TBN matrix is orthogonal, that means its inverse is simply its transpose. The remaining implementation details is dependent on your preference.
TBN = transpose(mat3(T, B, N));
Shadow mapping
Civet supports basic shadow mapping for both directional and point lights. This includes control over resolution and fidelity, as well as shadow anti-aliasing with PCF.
The concept behind generating shadow maps for directional lights and point lights differ slightly but the core ideas are mainly the same. For simplicity, I’ll only write about the implementation of directional light shadow mapping for Civet. For point lights, the technique, called omnidirectional shadow mapping, found by checking out lights.h, lights.cpp and the corresponding shaders in the Civet repository.
The basic idea for shadow mapping is to generate a map that determines which objects is hit directly by light from the light source. In other words, we find the objects in the scene that is visible to a light source. If this sounds familiar, then that’s because it is.
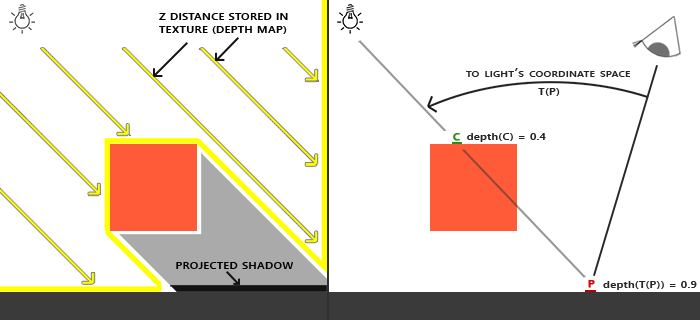
Simply, we generate a depth map of the scene from the perspective of the light source. The depth map determines which objects are exposed to the light and which are occluded to form shadows.

Notice how we can sample occlusion from the depth map
Since directional light approaches all objects in parallel lines, we use an orthographic projection to calculate the view from the light source. We send the projection and view matrix to the shader as a uniform as before.
Transform projection = orthographic(-10.0f, 10.0f, -10.0f, 10.0f, near_plane, far_plane);
Transform view = lookAtRH(Point3f(direction.x, direction.y, direction.z), Point3f(0, 0, 0), Vector3f(0, 1, 0));
Transform light_space_mat = projection * view;

glUniformMatrix4fv(glGetUniformLocation(depth_shader_program, "lightSpaceMatrix"), 1, GL_TRUE, light_space_mat);
Then in the vertex shader, we simply perform the vertex calculations and let OpenGL generate the depth map.
uniform mat4 lightSpaceMatrix;
uniform mat4 model;

void main() {
    gl_Position = lightSpaceMatrix * model * vec4(aPos, 1.0);
}
Since we are not actually doing any rendering, the fragment shader can be blank.
This depth map is captured in a framebuffer. As such, we have binded a specific framebuffer for the light source so, during drawing, all the information is provided in that framebuffer rather than the default one OpenGL uses. For each light-specific framebuffer, we generate a texture object in OpenGL and binded it to the framebuffer, configured to receive the depth map. Now, when we draw the scene from the light perspective, the depth map is stored on the texture object.
// generate framebuffer and texture
glGenFramebuffers(1, &FBO);
glGenTextures(1, &shadow_map);

// bind texture and configure
glBindTexture(GL_TEXTURE_2D, shadow_map);
glTexImage2D(GL_TEXTURE_2D, 0, GL_DEPTH_COMPONENT, resolution, resolution, 0, GL_DEPTH_COMPONENT, GL_FLOAT, nullptr);
glTexParameteri(...);
...
glBindTexture(GL_TEXTURE_2D, 0);

// bind framebuffer and attach texture
glBindFramebuffer(GL_FRAMEBUFFER, FBO);
glFramebufferTexture2D(GL_FRAMEBUFFER, GL_DEPTH_ATTACHMENT, GL_TEXTURE_2D, shadow_map, 0);
glDrawBuffer(GL_NONE);  ///< we don't need drawing or reading to any color buffer
glReadBuffer(GL_NONE);
glBindFramebuffer(GL_FRAMEBUFFER, 0);
Now that we have a shadow map, we can sample from it. The world-space fragment position has to first be transformed into the light source perspective, or in light-space.
uniform mat4 light_space_mat;
...
vec4 fragPosLightSpace = light_perspective_mat * vec4(worldPos, 1.0);
Then, the light-space fragment position is turned into normalized device coordinates, so we can sample from the shadow map texture. This means we map from [-w, w] to [0, 1], which is the range of values in the depth map.
vec3 projCoords = fragPosLightSpace.xyz / fragPosLightSpace.w;
projCoords = projCoords * 0.5 + 0.5;
Now, we calculate the shadow value at the fragment position. In other words, how much the fragment is occluded from the light. We get the depth of the current fragment from the projected coordinates. Then we sample the depth of the fragment closest to the light source. If the latter is a smaller value, then the fragment should have shadow.
float shadow = 0.0;
float bias = max(0.05 * (1.0 - dot(normal, -light.direction)), 0.005);
vec2 texelSize = 1.0 / textureSize(light.shadow_map, 0);
float currentDepth = projCoords.z;

// PCF, offset by 1 on each side
for (int x = -1; x <= 1; x++) {
    for (int y = -1; y <= 1; y++) {
        float pcfDepth = texture(light.shadow_map, projCoords.xy + vec2(x, y) * texelSize).r;
        shadow += currentDepth - bias > pcfDepth ? 1.0 : 0.0f;
    }
}

shadow /= 9.0;
Then we can use the shadow value to determine the final color of the fragment.
return (ambient + (1.0 - shadow) * (diffuse + specular));
Civet also includes a couple other shadow mapping techniques to produce a nicer looking shadow. Percentage-closer filtering (PCF) produces shadow values in between 0 and 1 by sampling the 8 fragments around the target fragment and producing an average shadow value. It also reduces the apparent blockiness that comes from a low depth map resolution.
To prevent shadow acne, another artifact caused by low depth map resolution, Civet also calculates and adds a shadow bias. This slightly decreases the sampled depth such that the fragments are all considered on the object surface (or below) and returns the more “correct” depth.
The current shadow map implementation is very inflexible, requiring careful selection of the resolution of shadow maps and viewing planes. In addition, to achieve high quality shadows, you would have to increase the shadow map resolution, which quickly takes up space in GPU memory. One improvement here then is using cascaded shadow maps, which store multiple depth maps of varying resolutions to render nice looking shadows both near and far away from the camera. I may be adding to Civet sometime in the future.
